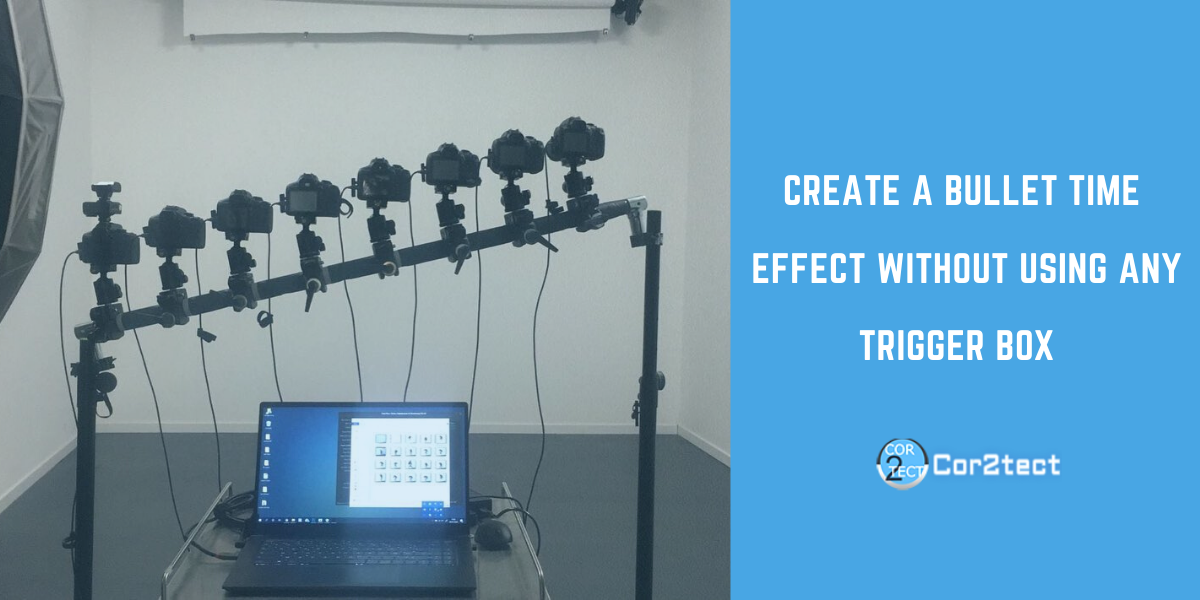
Bullet time effect is not something that is new or just has been discovered like the first picture of the black hole. The basic concept of bullet time is nothing but organizing multiple cameras and firing them all off one by one in rapid succession. That’s how the core concept of bullet time effect works but as of 2020 much has changed. Now we have new camera models and a bunch of software which aids in creating the effect without any trouble. Many people still use outdated hardware like trigger box and raspberry pi which makes the setup rumpled and not to mention if you are planning for an outdoor event a messy setup can create havoc. Today I will show you how you can create a perfect bullet time effect without using any trigger box or raspberry pi and by using built-in USB triggering
Article Contents
What is the bullet time effect
Hold on, It has nothing to do with guns and bullets, I had the same impression when I first heard the term. I became completely baffled when I learned what bullet-time actually is and discovered its relation to photography. The actual effect astonished me, prompting me to delve deeper into its intricacies. Bullet time represents just one of the many terms employed to articulate this astounding effect, including terms such as ‘bullet timeslice’, ‘Freeze time’, ‘frozen moment’, ‘dead time’, ‘flow motion’, ‘matrix effect’, and the list continues indefinitely. I bet you have seen the ‘The Matrix ’ where Keanu Reeves dodged bullets in a dramatic fashion and that scene is still popular even two decades have passed by.
If we go for a bookish definition this Bullet Time Effect is a mechanism used in filmmaking and games to turn time or slow down the time significantly. The time is slowed down enough to reveal things that are usually not visible and filmable, for instance moving spaces or bullets by using the perspectives of the frame and the vantage perspective of the viewer to travel around the background naturally when actions slow down in the sequence.
A bit blunt but in reality, it is not that much horrifying as the exact definition suggests. To put it simply its the process of using a bunch of cameras to shoot in a sequential manner to create a 3D effect to reveal the subject in such a way that creates a 3D motion effect. I hope you are with me till now because now we will dive into the types of bullet-time effects.
Types of Bullet time effect
Now you guys know what is a bullet time effect and many of us do not actually know there are actually types of bullet-time effects. Today we see the bullet-time effect in use for different photo booth companies all over the world. In countries like Indonesia, Malaysia, Russia, even in the USA it quite popular for live events.
The bullet time effect is also a popular form of Brand Activation which is also known as experiential marketing. Big brands like Redbull, Colgate all used bullet time effect to showcase their product. As the bullet time effect gives the brands 3D coverage it becomes ideal for launching new products. Though being used for different purposes we can categorize the bullet time in three main types:
1. 90 degrees bullet time effect
2. 180 degrees bullet time effect
3. 360 degrees bullet time effect
1. 90 degrees bullet time effect:
This is the basic bullet time effect and requires just basic setup. This type of effect covers the 90-degree angle of the subject and can be done using just 6 to 12 cameras. This type of bullet time is used by small to medium photo booth and event organizer companies as it requires less hassle over setup. That’s why this type of bullet-time effect is most popular for live events.
2. 180 degree bullet time effect:
As the name suggests 180 bullet time effect covers 180-degree curved angle and this type of bullet-time effect is ideal for big live events and outdoor setups as less camera is needed for building a rig for 180 bullet time effect. We will discuss more about the cameras and set up the overall rig for the 180 bullet time effect. 180 bullet time is quite popular among event organizers, photo booths and live event needs as you can create some stunning 180 effects utilizing just 12 to 18 cameras. This type of bullet time is most popular as it is easy to build and cost less.
3. 360 degree bullet time effect:
360 bullet time is popular among giant photo booth and experiential marketing companies as it gives a full 3D experience of the subject and the surroundings. The effect is taken from a 360-degree angle and creates a stunning circular effect. This is done using a circular rig and takes around 18 to 32 cameras to create a perfect 360-degree effect.
It takes a lot of effort and time to build a rig for the 360 bullet time effect. The use of 360 bullet time on a live event is not that popular due to its setup hassle and not to mention the costs start to pile up as you add more cameras to your rig. It is possible to do a complete 360 video effect using 18 to 20 cameras but to create a mind-blowing output you need at least 24-32 cameras as it makes the rig bigger and captures more sequences. We have a separate article that will help you to create 360 Bullet time effect.
Requirements for the bullet time effect
The bullet time effect requires both the hardware and the software. First, you will look into the hardware requirements for bullet-time then move onto the software details.
Hardware for Bullet time effect
Bullet time effect requires not much if you are using the latest technologies. Back in early 2000, you needed a bunch of hardware like raspberry pi for camera connection and an external trigger box for shooting the cameras one by one. The problem with the raspberry pi and external trigger box was the messy setup. But you will show you how you can create a bullet time effect without using any external trigger box and raspberry pi. You need the following hardware:
1. A desktop computer or a laptop.
2. DSLR cameras
3. Power Adapter for Camera
4. Powered USB Hub
5. USB cables
6. A camera rig.
1. Computer:
For bullet-time effect both 90, 180 and 360, you need an optimal performing desktop or laptop computer. The specification of the computer will depend on the number of cameras you plan to use. You do not need a high-end computer for bullet time but a semi gaming desktop computer is recommended however you can also do it using a high performing laptop.
2. Camera:
For one computer you can use up to 60 DSLR cameras for fast output processing but you can use 100 or even 200+ cameras but you will be needing more computers for it. For basic 90-degree 12 cameras are enough. Now it’s time for you to decide how many you want to use. If you are looking for 180-degree effects I recommend you use 18 cameras and for the 360-degree effect the recommended number of cameras is 24. It is still possible to add 100+ cameras to one single computer but it will be a bit slow.
3. Power Adapter for Camera:
You will need a power adapter for each camera. Connect the cameras using a power adapter to ensure continuous power. Camera batteries can be used for power but not recommended for live events as you need the cameras to stay awake for a longer period of time.
4. USB Cable:
Instead of raspberry pi we will be using USB cables to connect one camera to another. Using USB cables is the easiest and cheapest way to connect multiple cameras together. Your overall setup will also look neat and clean which makes it ideal for live events.
5. Powered USB hub:
All the USB cables will have to be connected with a powered USB hub and the hub will be connected with the computer you are using. USB hubs are easy to use and found on any hardware store around the neighborhood. A powered 12 volt or more is recommended and you can use Anker’s powered USB hub.
6. Camera Array Rig:
Depending on the number of cameras you want to use you need to build a camera array rig. You can build a DIY rig or you can buy a rig too. It’s better to build a rig according to your specifications. If you are planning to build a 180-degree rig the cameras need to be placed in a curved setup. The 360-degree rigs are made circular and the subject stays in the middle of the setup. However, for 90-degree you can place the cameras in a vertical or horizontal manner in a straight line.
Software for Bullet time effect. You if are struggling to create bullet time effect rig you have a separate article which is all about building rigs for bullet time effect so make sure you check that out,
You can also use flash for bullet time effect. I have a separate blog on this topic. So make sure you check out how to use studio or strobe flash for bullet time effect.
 For Events During COVID-19
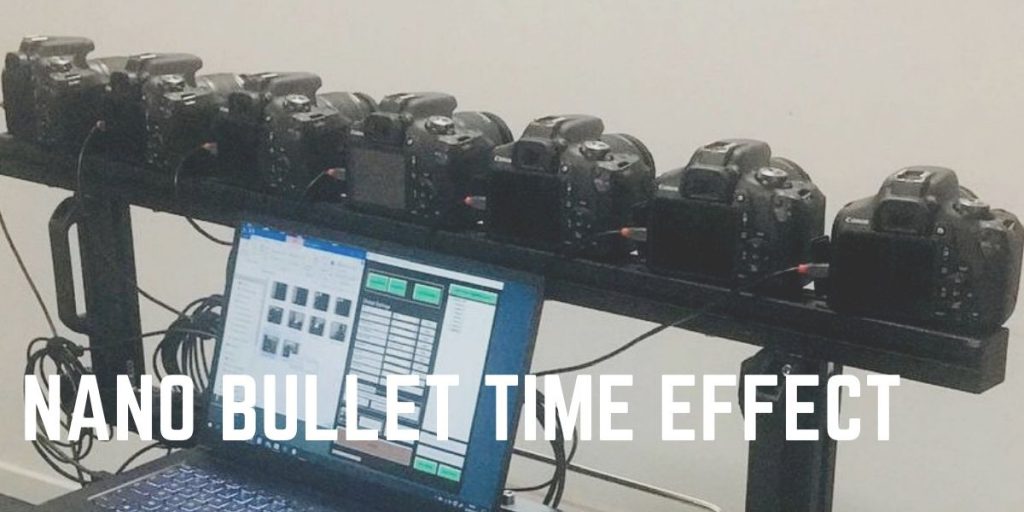
COVID-19 has turned the event industry upside down & the bullet time event industry was no exception. Due to increased social distancing among general mass setting up big bullet time rigs has decreased dramatically and people are shifting towards smaller rigs. Cor2tect has released a new software for Bullet Time which is called Nano Bullet Time Effect which is considered to be the best Multi Camera Rig for events during COVID-19. Using this you can trigger 6 cameras and use Diphideo Sharing Station which supports multiple sharing devices for free. Currently this Nano Bullet Time Effect is on sale so contact us to book your package today.
Software for Bullet time effect
Once you have the hardware setup it’s time for the most crucial part. The software is the most important part of the bullet-time effect. One important thing to remember that bullet time is not a video effect it’s an image effect. Each camera takes one frame and shoots at a set interval. The software stitches up each frame and renders an MP4 or GIF output. Not to mention there are camera settings, stabilization and a bunch of different effects that are added to the final output. If you want to do it manually it will be a nightmare for any professional editor. It will take a lot of time to process the output and transferring the images from the computer to a workstation oh boy I guess you can imagine the hassle. That’s why software is used for preparing the final output.
Cor2tect offers the most unique software for the bullet time effect due to its vast customizability and usability. As you will be just using USB to connect the cameras your overall setup will be neat and clean as there won’t be any extra cable. With a built-in fast triggering system, you do not need to use any external trigger box.
Benefits
With Cor2tect’s bullet time software solution, you will get the following benefits:
1. Eliminate the use of analog or external trigger box for bullet timeslice
2. Throw out your Raspberry PI microprocessor as a USB hub is enough to connect 50+ cameras in just one PC.
3. You just need one click to create the perfect 3D bullet time slice effect.
4. Add the Jump & freeze effect without any analog trigger box.
5. Automatic solution for fast video processing
6. All-inclusive service for your live event’s needs.
7. Bespoke service according to your business needs for a hassle-free setup.
8. Free 24/7 online support
9. Superfast calibration in any situation.
Color Grading and Super Slow Motion Bullet Time Effect
Cor2tect just launched a super slow motion effect for Bullet Time and it is blowing people’s mind and you can also get your hands on the latest version of Cor2tect’s 3D Bullet Timeslice Booth.
Another useful feature of Cor2tect’s software is color grading. When running a live event in outdoors the lighting setup and getting the perfect light for your outputs can be quite troublesome. The advanced color grading option from Cor2tect can be your lifesaver and the best part is it’s super easy to apply.There are actually two methods of applying this.
First Method
The first one is by using an existing image. All you need to do is find an image that is perfect for lighting. You simply select the image from our software and the color grading of your video or image will be set automatically according to the images you just selected. This is super easy, fast, and perfect for live events.
Second Method
The second method is for the people who are involved in post-production and does not get satisfied too easily. Thought manually editing the color grading can be quite a time-consuming task but there are people who would like to have the final touch themselves rather than automation. So for those people, you can select .cube extension and select the color according to your needs. Once you are happy with the color of grading of the cube file it will be added automatically on your video or images.
The highly customizable feature of Cor2tect’s bullet-time effect solution is that the software can be integrated with any other software or tools you are interested in, upon request. Additionally, a sharing station can be added to the software, allowing event photos and videos to be shared with guests with a simple click of a button.
Camera models and the bullet time multi camera array
When we are talking about bullet time effect the camera models play a big part as a lot of things depend on the camera type and models. When you are using the Cor2tect’s bullet-time effect you can use the following cameras:
1. Canon DSLR
2. Nikon DSLR
3. Webcams
You can also use different DSLR camera models together but you have to make sure they belong to the same company. For example, if you are using Canon you can use a bunch of different camera models together and there are no issues with the sync and calibration. If you are looking to a fresh start then I recommend the basic canon camera models like Canon 1100D which is quite popular in the Asian region. But in the American region, the model name is different. The basic camera model in the USA is known as EOS Rebel T6 or T7. As you will be buying 6 to 32 cameras depending on your rig so its best to buy the basic models.
For the multi-camera array, you can use 200+ cameras and build your array according to your specifications and needs. The curved one or the circular one it all depends on your clients and event needs. It’s common these days to buy a built-in camera array but the DIY method is the best as you have total control over all the aspects of the array like camera models, camera placement and so on. The idea gap between each camera is 2 inches and less the gap the better. But on the downside when you narrow down the gap you will be needing more cameras.
Setup, connect and trigger
Now you have the multi-camera array now also know how the software works. It’s time for the actual deal, in this section I will give a step by step process on how to set up the camera array and connect cameras with the software.
Step 1: Camera Setup
If you are using Cor2tect’s bullet time solution setting up the camera is easy. All you need to do is get a USB hub. I am sure you know what is a USB hub and you can get one from any local hardware store. So first connect each camera using USB cables in the USB hub.The USB hub cable connects with the PC. After successfully connecting the cameras, a notification appears indicating that the cameras have been successfully connected to the computer. For live events, you need to use a power adapter for each camera which will ensure seamless power supply.
Step 2: Camera Connection
Once you have the confirmation that the cameras have been connected with the computer you need to start the software. On the software, you will see that it has detected the cameras. Now simply connect the cameras. You can select all the cameras or you can select some of those. For example, you have connected 20 cameras via USB hub but you want to use 12 cameras for a particular shoot so you can manually select which cameras you want to use.
Step 3: Camera Triggering
You are almost there as now you need to set your camera settings like ISO, shutter speed, aperture and so one. You can control all the camera settings from the software. Once you are happy with the settings you need to calibrate the cameras. It takes 5-10 seconds and can be done using any horizontal bar which has 4 bring objects on it. The bright object can be green or yellow. The horizontal straight bar is used when you are doing 90 and 180 bullet timeslice. For 360 bullet time, you need to calibrate using a bar that is round in shape as you will cover 360 angles with your bullet time video. Once the calibration is done you can start shooting. You don’t need any trigger box for triggering the cameras.
You can trigger the cameras from the software and there is an auto-export option. By enabling auto-export mode you can generate output in real-time. You can generate output up to 4K which you select MP4 output and there is also an option for generating GIF. Another cool feature is that you can shoot in unattended mode using a Bluetooth controller once you have configured all your settings. This feature can quite handy during live events when you are running low on manpower. Now just trigger and generate output in realtime under five seconds.
That’s it, I hope you were with me till now and actually bullet time is not that complicated as it sounds if you have the right tools and software with a bit of know-how you can create a stunning bullet time art in less than 5 seconds. If you still have any queries make sure you get in touch with us.
